In this post, I will show how to provide localization in custom pages for model-driven app step by step.
For standalone canvas apps, we usually use Language() function to detect users' language and LookUp some translated text from static data which contains localization and language code.
In contrast with it, localizing contents in custom pages is acheved by adding RESX Web resources to your page.
The process has the following steps:
- Prepare Resx web resources (Xml file) containing key-localize text pairs
- Import resources to solution through modern designer
- Set ResourceName.KeyName for some controls in page

1. Prepare Resx Web resource
Resx web resource contains the keys and localized string value pairs for a single language defined using the RESX XML.
One key-text block is written as following;
    <data name="key_name">
        <value>Translated Text here</value>
    </data>
where name="key_name" will be referenced from Power Apps formula, and it returns inner text of <value>~</value>.
Assuming to support two languages - English and Japanese as example, maker needs to prepare two Resx files, like..
LocSample.1033.resx
<root>
    <data name="label1">
        <value>Hello</value>
    </data>
    <data name="label2">
        <value>This is a text for Label2</value>
    </data>
</root>
LocSample.1041.resx
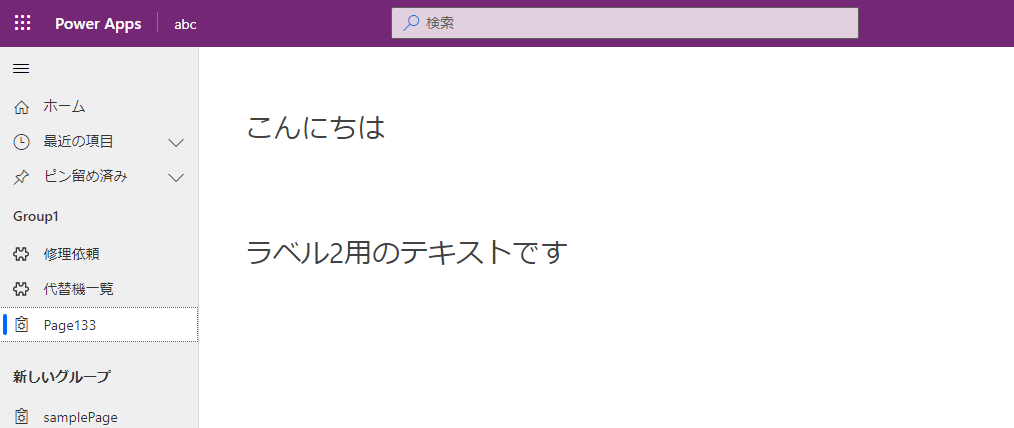
<root>
    <data name="label1">
        <value>こんにちは</value>
    </data>
    <data name="label2">
        <value>これはLabel2用のテキストです</value>
    </data>
</root>
The file name does not necessarily have to be in this format, but the extension should be resx.
2. Import resources to custom page
Next step is to import above resources to solution through Modern Designer for model-driven app.
In custom page editor (Power Apps studio), you will see "Resources" tab in the menu on the left panel.
To add resources to custom page, click "Add resource" button.

A dialog box will immediately appear with the list of resources in the solution. This time, we will upload a new resource, so click "+New web resource" in the upper right corner.
When uploading, please make sure that the display names are the same. Power Apps will refer to the resource by this name later.
Also, make sure that the "Name" is in format Text. Language Code.resx. Otherwise, Power Apps will not be able to load the file.

After you have finished uploading the two files, check the resources for the language you are using in Studio and add them to Power Apps.
3. Reference resource from Power Apps formula
Once the resources have been added, all that is left to do is to use labels or text input to load them with Resource name.Key name in formula bar.

After publishing pages and app, user will see translated text based on their preffered language setting.
This mechanism not only makes it very easy to apply localization, but also provides localized text that is consistent with model-driven apps by referring to language settings rather than the user's browser language.